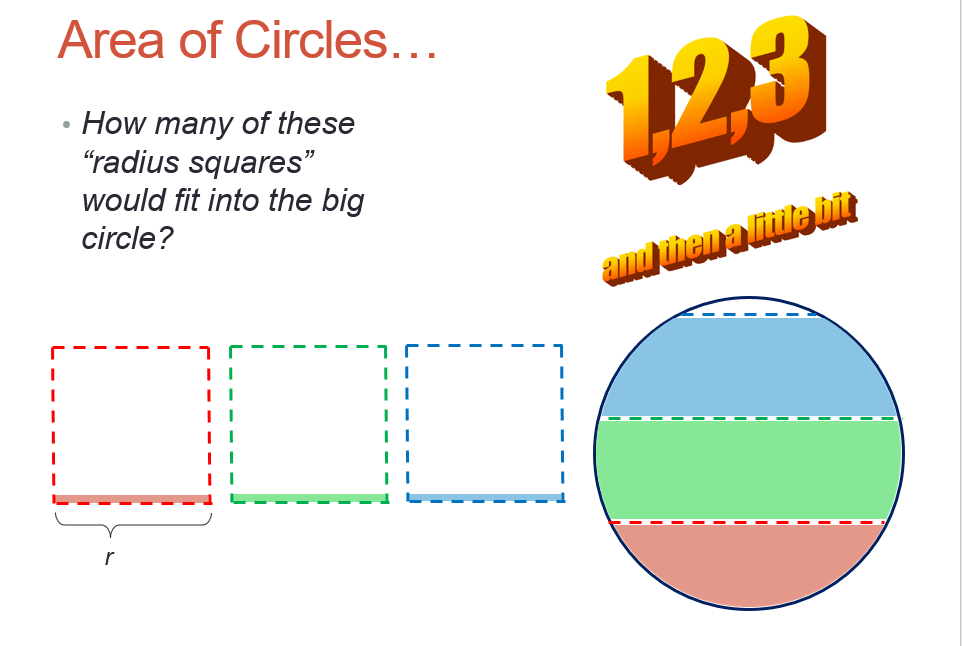
I made some visuals for teaching circumference and area of circles, with the intention of showing why we use pi (three and then a little bit).
Circumference:
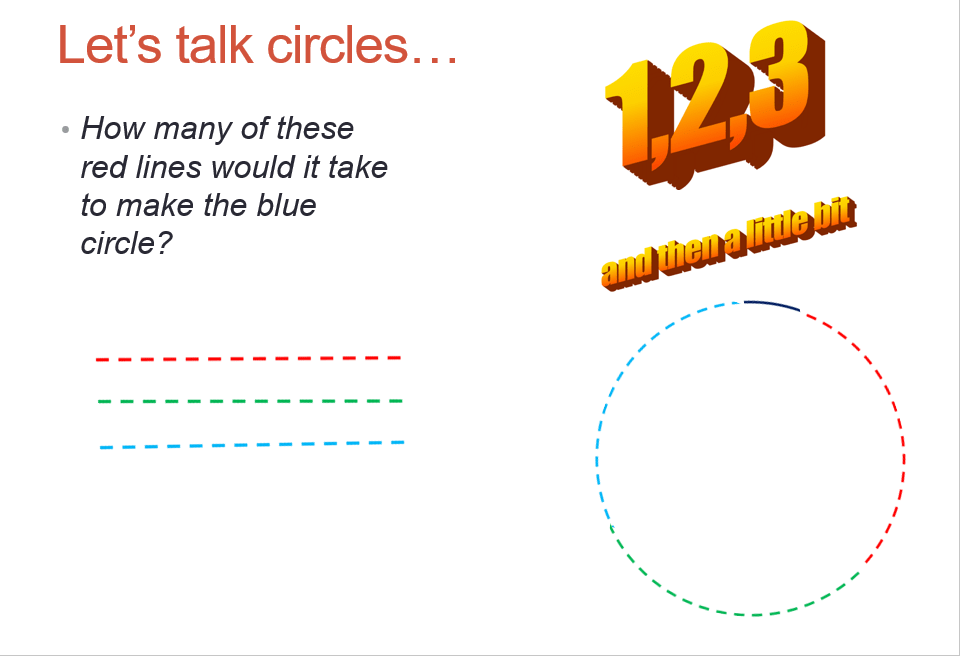
And area:
These slides (plus a couple more) are here:
Games plus math. Plus booger jokes. Resources for Math Teachers.
I made some visuals for teaching circumference and area of circles, with the intention of showing why we use pi (three and then a little bit).
Circumference:
And area:
These slides (plus a couple more) are here:

Been a while since I have posted about any of the escape rooms that I created in Seattle, but this one I finished last year is pretty fun. Normally, I make the boxes with scary or exciting premises (haunted mansions, deserted islands etc…) but this one uses a very different aesthetic.
Teach your color printer a lesson, and come join me in the Bahamas for Tropical Trigonometry Barbie!
Before you get too far in, this one is kindof a bear to put together. You will need a laminator, color printer, printable transparency paper and this thing:

here it is with the clues locked inside

I invented this because I wanted a way for the kids to earn each clue, one at a time. It works great for this box, and they were pretty easy to build. I used two old clipboards, cut them down to size, glued sections of meter stick along the sides, and drilled some holes in the top. This thing doesn’t have a name yet, so I’m taking submissions. Apologies that I didn’t take more pictures of the construction process, but “free math-based escape rooms” is a niche market. You get what you pay for.
Anyway, construction of the clues takes a minute as well. Print the five colorful triangles out on the transparency paper (amazon link: https://tinyurl.com/y2je2m7e), and cut them out.

I replaced all the triangles that you can see in the clues below with these transparent, colorful triangle windows before I laminated the clues. All the clues fit together to create complete colorful triangles, and students will need to earn ALL of the locked up clues to collect all the necessary triangle pieces and open up the final box.
The starting clue is this one: (3 digit: 430)

On the back of this clue is this:

For right now, they cannot complete the “smallest area to biggest area” puzzle, (because lots of information is missing), but the map on the back is solvable (430 miles). Once they solve the map, they can unlock the first lock that frees the second clue. Make sure you lock “clue 1” up with the three digit lock.

This one isn’t even really a clue at all, but I used a brad to attach the key to the lock. The lock unlocks the next lock (key lock) AND the blue and orange triangle bits are needed to solve the final puzzle (more on that soon)
Clue 2:

Make sure you lock up clue 2 with the key lock. Clue 2 asks students to compare trig ratios. The pink fish contains “sin a.” Using the diagrams above, you can see that the value of sina is equal to 3/5. If you follow the equivalent fish (cos c, 3/5, sin x, 0.6, cos z) you trace out a path that is R,D,D,L,L, and that will be the combination on the direction lock keeping clue 3 locked up. Also notice a piece of the green triangle is hiding on there. This clue also fits against the side of the area clue that the students started with.
Clue 3: Make sure that you lock up clue three with the direction lock.

I spent an embarrassing amount of time looking for one last good image to use with this box, and this is a screengrab from the Netflix Barbie movie “A Mermaid Tale.” These are the things I do for my students. The missing angle is about 37 degrees, and the missing side is about 46, making the combination 4637. This unlocks one of the two locks on the hasp/box.
In order to unlock the other lock, the students will need to piece together the triangle pieces that can be found on each one of the clues. When you arrange the clues like this…
…The triangles line up and you can find the areas. From smallest to largest area, the triangles are ordered Pink, Green, Orange, Yellow, Blue. That same order of colors is the combination on the FINAL lock (5 digit, color)..
As always, If you have any ideas for other clues that would fit with this content and this theme, hit me up on twitter. I’m always looking for more ideas. Otherwise, below is a ppt and pdf of the clues explained above. Enjoy!
ppt
Many of you have probably used Robert Kaplinsky and Nanette Johnson’s wonderful Open Middle math problems. There are great problems and resources for running these problems with students on the open middle website and in Robert’s book.
The best ones are on their site, but I have made a few that I shared on my twitter.


The idea I had last week was to think about “playing” this problem against someone else. OPEN MIDDLE VERSUS.

I haven’t tried anything like this with students yet, but I think it could be a fun extra layer. Not only do students need to figure out which digits they need to create a large value for x (9, 8 and 1) but they need to figure out how the numbers play together, and which one is the most important to creating a big value for x. I think the 1 is most important, so maybe this version of this problem would drive a better discussion:

I think it could lead to some fun discussions in class, and you could use this for any type of open middle problem that uses 3 or 4 numbers:

Again, 1 is going to be very important. Is there a reason why?
I cannot take credit for any of this. I just loved playing around with these games with my students and I formatted them into a ppt file.

I stumbled across this incredible Ben Orlin blog post while I was poking through Desmos activities to run the first day of this new semester. Go read it. It’s funny, and gives descriptions of six delightful 1 vs 1 games from game designer Walter Joris.
I ended up formatting the instructions to these games into a powerpoint with Ben’s drawings so that I could project them onto the board for my students. The first day back, I brought a ream of blank paper and a bag of bon-bon-booms as prizes. (If you’ve been to a tienda in south america, you get it. The red ones are best.)
I drew a bracket on the board with student names, and after each game, the winner moved on. The detailed instructions are in the blog post linked above, but the ppt file is linked below. Black hole was our favorite game, but “collector” wasn’t far behind.

I wrote a book!
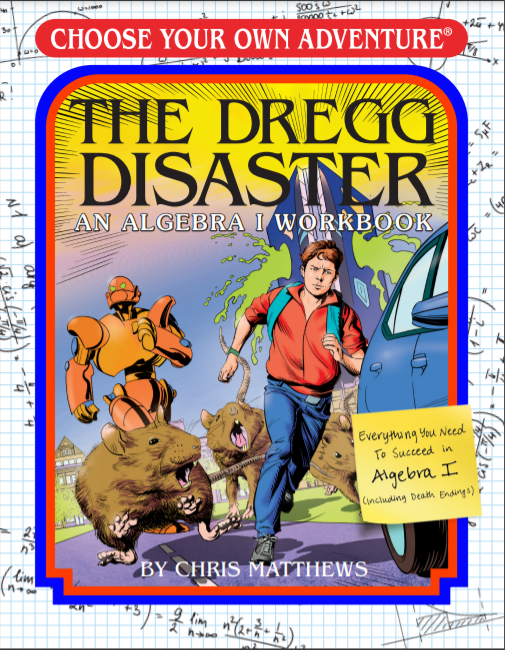
We have the story edits finalized and it is officially available for pre-order, which is pretty crazy. I WROTE A BOOK! It will be officially available sometime this year (looking like October), and I hope that my vision for this book translates to a fun, rigorous, Algebra 1 review. I am filled with so many emotions! I’m thrilled to share this vision of gamified math with readers, and I am so excited to actually hold something in my hand after the countless hours and frustrations that it took to put all the pieces of this project together. It’s been two and a half years since I first started working on this book as a side-project to my teaching job, which is a long time.
Enough time -in fact- to get engaged, cut my hair into a mullet, change jobs and move to a new country.
Most of all though, I cannot wait to see how students connect with it. I hope that students that already love math will find a book of puzzles that speaks a language that they understand. I hope that reluctant math learners will find a story that motivates them to learn new things.
Here’s a link to the book on the CYOA website, and it’s also on Amazon, if you want to help Bezos go back to space:
I don’t think that there has ever been a book quite like this one, so I made a few FAQ’s
Q: Is it a math book, or is it a Choose Your Own Adventure book?
A: Yes? Both. It has pictures, it has a silly adventure narrative with an evil corporation, talking animals, laser robots, shrink rays and mysterious portals. It also has Algebra-1 level math problems (and a free workbook download where kids can show their work and get more practice on each type of math problem that shows up in the story).
Here is a picture of what we are working with on the first page:

As you can see, there is a narrative section, and below that, a math problem
Students need to solve the math problem, and the the answer is the page where the story continues. The solution on this page is 13, so you would turn to page 13 to continue reading. Students will need to practice their algebra 1 skills to navigate through the book.
Q: ??? What ???
A: This book works like a normal CYOA book, with math as the connective tissue. The page numbers are the answers to the problems in the book. Read some story. Solve a math problem. Continue to a new page.
It is broken into four chapters. Each chapter includes death endings and choices that the reader will need to make to take on the nefarious Dregg Corporation. In addition, the types of math problems change from chapter to chapter. The first chapter focuses on equations, the second focuses on slope and lines, the third is quadratics, and the fourth is data and frequency tables. Every pathway through each chapter hits the same sequence of math problems, regardless of choices made by the reader.
Or maybe you die. It’s a CYOA book.
Every pathway follows the exact same sequence of math standards, but contains different story choices. The answer to each problem leads you to the next page in the story. New page, new story and new math skill.
Q: What if I get stuck?
A: Each chapter has an “Adventure Advice” section that explains the problem types found in each chapter, and serves as an answer key. If you don’t understand every problem type in the book, that’s okay! This is intended as a learning resource.
THANK YOUS. I did not do this alone.
Thanks to Shannon, Rachel, Melissa and Julie for helping this book take shape. I am very grateful to Shannon in particular for seeing value in this idea, and helping it to reach the finish line. Thanks too to my math brother, Chris Bakke for helping pick the math standards, and create some of the math problems. I still haven’t seen most of the art, but thanks too to the artists. Eoin Coveney did the cover, and Maria Pesado did all the illustrations inside the book, AND she re-drew all the math problems so that they pop. I hope that you like what we have been able to create!

Ten years ago, I found the game Qwixx at a game shop in Seattle. The bright colors on the box sucked me in. It is the perfect mix of strategy and luck, and it has a ton of replay value. It’s a seriously great game.
They have been making a bunch of expansions for it (especially in Europe), and me and my buddy Chris Bakke found a version where the colors are all scrambled around. It’s called “qwixx mixx.” and it looks like this:
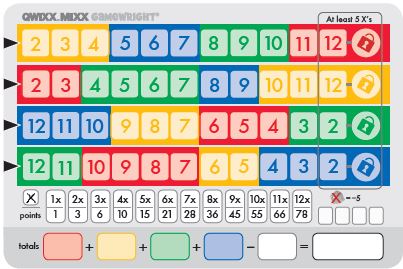
The color of each space corresponds to a dice color, and in this version, instead of closing out a “row” you close out a “color.” (Full rules for these boards are available here) It’s a fun wrinkle, and we started talking about what OTHER ways you could reconfigure the colors of the board. Like, why can’t you play with a board that looks like this?:

Or this one:

I ended up using ppt and making a bunch of the patterns that we talked about. I printed them on cardstock, and laminated the fronts, so we could use them with dry erase markers. If you print them from the pdf (or “2 slides per page from the ppt) they are the perfect size to fit in the box that comes with the game. Now when we play, we start by drawing a board at random from the deck of 12 or so boards that we created. Your board doesn’t match your opponents, but the probabilities are similar (or the same) and it makes every game a little different. I love the added variety, and because all this fits in the little box, it’s a game that Emily and I bring with us whenever we go anywhere.

Also, the best image of a qwixx board that I was able to find at the time is in dutch, so as an added punishment for taking a strike you have to try to pronounce “Elke mislukte worp.”
A quick write-up on an even quicker routine that I use regularly in my class: Pick ’em.

Who doesn’t like a good booger joke?
Way back when I was teaching in Denver, I came up with this idea for a role board. Each desk in each group (I group my kids in groups of 4) gets a small dot of nail polish. Red, Blue, Green or Yellow. It lets me assign tasks randomly to students in a group. For example, “Red desk, bring up papers for your group” or “Blue desks, share your ideas at your table first.”
To go with the dots of color, I bought these clear containers at The Container Store and made some little colored circles out of construction paper and a Dominoes pizza box.

The circles are red, blue, green and yellow and match the dots on the desks, and I move the dots each time before I use them to assign jobs. With the “1,2,3,4” role cards shown above, the blue desk would go first, then the green desk, then red, then yellow.
I like this setup because it is very visually clear what each kid should be doing, and it keeps things random for the kids. It’s also very easy to create new “role” cards for behind the dots, so you can use the roles for a wide variety of classroom activities. I use this role board with many of my classroom routines, but this is the simplest one. I use it as a better “you do” activity when I use direct instruction in class.

I start by putting up a set of problems (this is a graphing problem set) for the kids to see. The desk whose color is in the “1” position gets first “pick” of the problems on the board. They would share with their group what they pick, and begin working. “2” picks next and so on. No two members of a group can pick the same problem. It introduces a small amount of choice to class, every kid at each table gets a different problem, and gets the kids talking about the problems that they are working on.
I also use a variant often that I call “Pick and Role”

It’s basically the same thing, but I have the students TEACH the rest of their groups how to solve the problem that they are working on. I usually provide a vocab bank for them to use, and again, I use the role board to assign who explains their process/ thinking first.
Sometimes, I have the kids pass their mini-whiteboards to the next person in their group to have them grade each other’s work. I call that Pick ’em, Pass ’em. And I use this graphic. Because Boogers are funny. Even if you’re 34 years old.

Wanted to share a quick proportional puzzle/resource. I created this while I was working in Seattle, and I thought it was fun. Students get a set of six recipe cards with ingredients to make chocolate cake. One such card is shown below.

As you can see, this recipe is for 48 people, and it is MISSING several key ingredients. The other recipe cards include the same recipe for a different number of servings and different missing ingredients.

Students must use the clues on the different recipe cards as well as their proportional reasoning skills (cross multiplication, scale factor, unit rates) to fill in the missing pieces and create a complete recipe. I had them create a recipe for 12 people from the information on the cards.

I printed and laminated these cards on sheets of differently colored paper so they stand apart. Before the pandemic, we actually made the recipe, and cooked the batter in orange rinds (in tin foil) on a barbeque grill. It worked pretty well, and it was a fun application of proportional reasoning.
Resources here!
I wanted to share a quick routine that I have been using in my classroom the last couple of years. I found these funky dice at a stand at NCTM in Seattle three or four years ago. Each big die has a smaller one inside. I bought them without really knowing how I was going to use them.

(They are also available on amazon)
Over the last few years, I have started using them more and more as a way to quickly randomize problem sets in class. I created a slide template, and I plop in numbers based on the skill that we are working on. It looks like this:

The slide above would be displayed for the kids to see. Students roll the dice, and they generate a math problem based on the values on the dice. So a roll of 4 on the big dice and 2 on the little dice would generate a problem that reads 37/11. This particular slide was to practice reducing improper fractions, but the attached powerpoint file has a bunch of other problem sets as well.
I like this routine for a few reasons. Rolling dice automatically hooks kids. Dice are fun, and they seem to get started quicker when they have to do the small task of finding and writing down their problem. I also like this routine because it shows that the numbers work together the same way, no matter which values they roll. There is no magic to the numbers. They are learning a process or math idea that works no matter what numbers the dice ask them to use.
Here are some resources.
I have created a bunch of these slides for my Algebra 1, Geometry and Pre-Algebra classes, and I slapped them all together into this powerpoint. The skills included here: improper fractions, percent change, graphing linear inequalities, distance formula, adding integers, subtracting polynomials, 2 step equations, equation of a line through two points, solving formulas for a new variable, solving proportions, missing angle in a triangle and surface area of a cylinder.
Target had these bingo boards on sale earlier this week so I bought a bunch.

Internet link: here
I had this idea a while ago for a review activity built around bingo. I generated a bunch of bingo cards with the numbers -11 through 12 (plus a free space) that would fit into these bingo frames. I printed them double sided, and laminated them before creating a ppt file with some quadratic equations on it.

Kids solve the quadratic equation on a whiteboard, and mark down their answers by closing the little windows on the bingo boards. (If they get +8 and-5 as solutions, they would close those frames on the bingo board.) It works well with quadratic equations, because each problem they solve, they are rewarded with two frames, and solving FAST is not nearly as valuable as accuracy and choosing a lucky board. I think it will work well with traditional linear equations too, but that’s an application that I will try next year! Slides and bingo boards are below!
