Color-by-Number Math

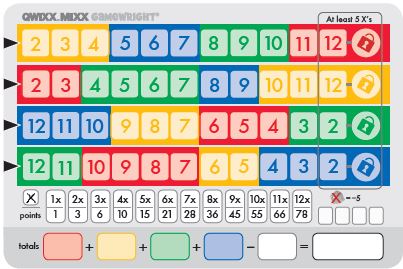
Color-by-number! With my writing, I have been playing around with ways to make the answer to a math problem something that is more interactive. Color by number is one thing that I stumbled upon last year, and I think it’s got some mad potential for older learners. (I freely admit that I am not the first teacher to create this. There are lots of TPT resources and freebies online, but they are generally reserved for younger grades and practicing basic operations. This resource I built out for my 8th graders practicing equations. The image is from a google image search and not my own):

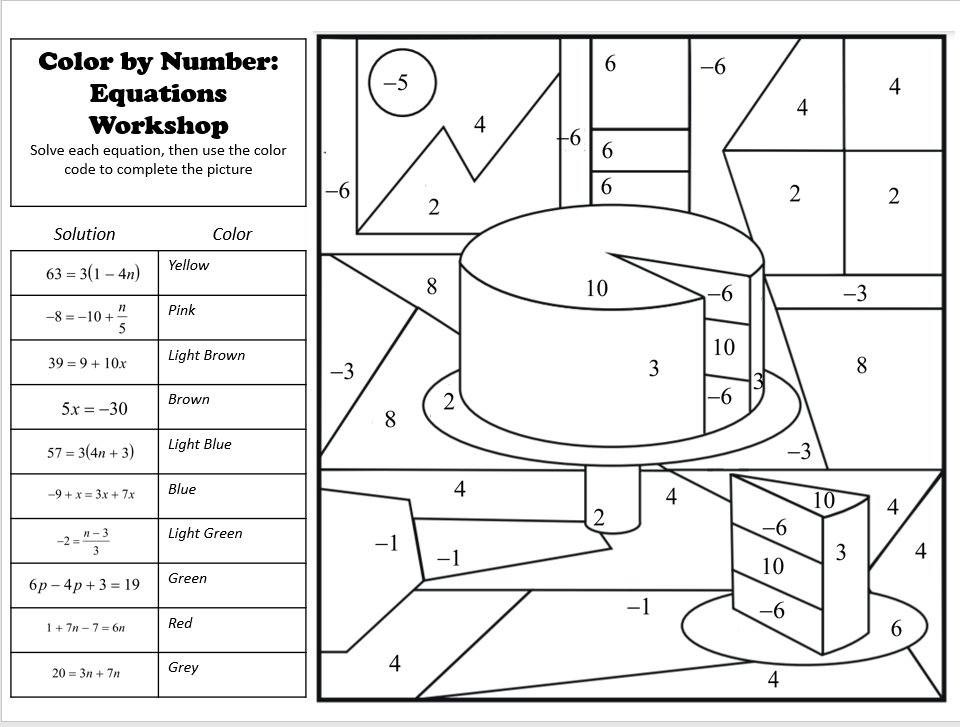
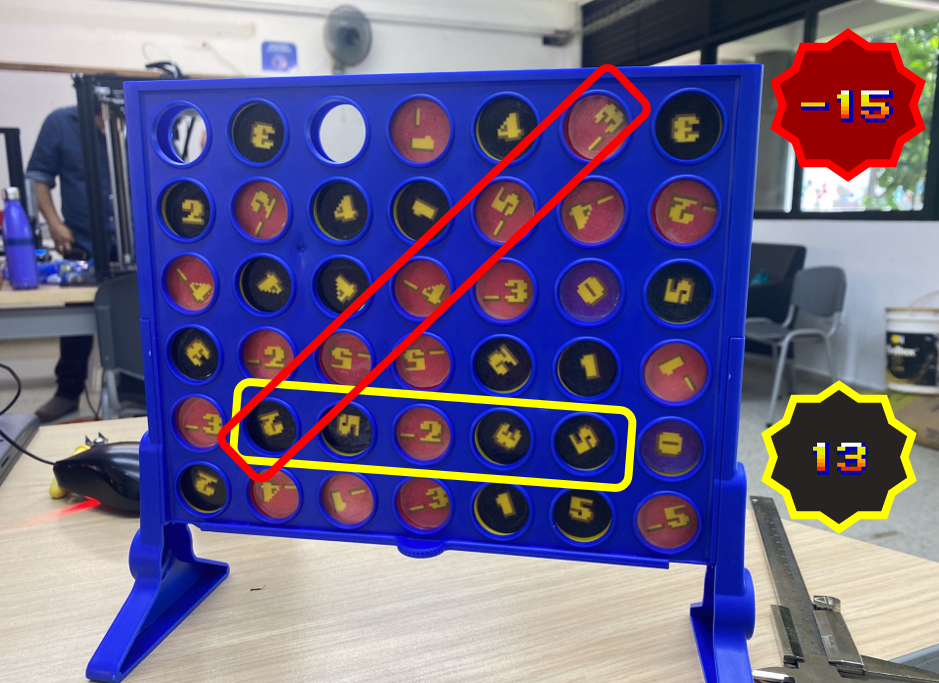
The equations that students must solve are presented on the left. Once they solve an equation, they can color in the spaces with the corresponding color. (For example, the solution to 63=3(1-4n) is -5, so any space with a -5 on it should get colored in yellow.)

I used it as a part of a review project after we had spent a couple weeks solving equations. I put out a big bowl of colored pencils and let them dig in. took about 35 minutes to complete.

I also spent a two days where students built their own color by number math art. I gave parameters for the types of problems that they used, and asked them to build something creative. Some were better than others, but I absolutely need to share this color by number piece from Luz, cuz it rips.

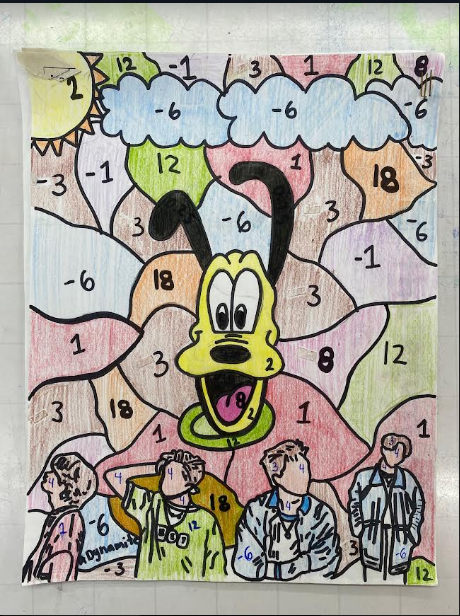
It’s Pluto with some of the members of k-pop band BTS. Why are they all together? Ask Luz.

I’ve been sitting on this post for a WHILE because it is going to be a big part of my new Choose Your Own Adventure book, Fraction Action: Double Feature, and I didn’t want you vultures to steal all my good ideas 😉

Here is a downloadable pdf version of the “equations workshop” sheet shown above, and it has the problems in bigger boxes to be printed on the back.

Here is the powerpoint version if you want to add math that works better with your students! Enjoy!

Hi-5, Low-5 (Connect 4)

I saw a copy of connect 4 in the duty-free store at the airport the other day, and it got my mind turning.

First, I should have bought connect 4 it at the airport. No dutys.

Second, it inspired me to make this integer practice game for my 6th/7th graders to practice with next year.

Rules are pretty similar to the original game. Players take turns dropping tokens into the gameboard. There are a few wrinkles to this version. One player uses the black tokens (positive) and the other player uses the (negative) red tokens. Right now, the set I made has 4 copies each of values from 1-5, plus a zero for each player.

Each player is trying to place their tiles so they create a 5 token set (vertical horizontal or diagonal) with the greatest value. Red is trying to create the greatest negative number and black is trying to create the biggest positive number. It will be almost impossible to get five of your tokens in a row, so your score will likely include one or more of the other player’s tiles. Do you use your 5 token to build your own score, or play it defensively to block the other player? In the example gameboard below, the positive player was able to score 13. The negative player got to negative 15, so negative beats positive. Low-5 wins! Down low!

That’s about it. A lot of the best math thinking for this game comes from just looking at the board at the end and trying to optimize your score, but there is some really good strategy throughout the game too. Where do you use your fives? Where do you hide your zero and ones?

If you are interested in trying out this new connect 4 variant, I would love some help play-testing this bad boy. It’s fun, but there are almost certainly some other wrinkles that would make it even better. HMU with some feedback. Below are some printables so you can make your own integer connect 4 board at home. I laminated the little circles and then attached them to the tokens with Elmer’s glue.

I ALSO have been playing around with our school’s 3D printer, and I included some tinkercad files for pieces if you want to print out the pieces (with way less gluing!). The trial run came out pretty cool!

Negative tokens for a 3D printer: https://www.tinkercad.com/things/84fodAocHtN

Positive tokens for a 3D printer: https://www.tinkercad.com/things/g0lQZxJttw0

Segment Says

Shout out to Patricio, who came up with the idea for this game.

We are currently doing a little geometry mini-unit in 8th grade, and one of my students had this idea for a vocab game. We ran it today, and it rules.

It’s “Simon Says” but with some geometry themed prompts. Some of the ones that we used today were as follows:

“Segment says: Make a line” (lines continue forever in both directions, so students point with their fingers)

“Segment says: Make your line steeper.”

“Segment says: Make a line segment” (line segments terminate at both ends, so students ball up their fists)

Segment says: Make a ray that points to the door(One hand pointing, one hand is a fist)

“Segment says: Make a 90 degree angle”

“Segment says: Make a line with a slope of zero” (undefined works great too.)

“Segment says: Find a friend and make supplementary angles.”

“Make an obtuse angle.”

You’re out! I didn’t say “Segment says!”

Information Gap Math

A few years back, I attended the NCTM conference in Seattle and had my mind blown a little bit at the Illustrative Math session I attended. I loved a few of their routines, but my favorite was one that I had never heard of called “Information Gap”. They blog about it here.

Info gap essentially turns any word problem into a collaborative partner routine. You separate the essential information into two cards, and students are not allowed to show their partner what is on their card. They can ask questions, and even read what is on their card, but it is not possible to find the correct solution without the help of their partner. They must find some way to navigate this “information gap” together. I loved the discussion that this routine fostered, and the level of rigor that you are able to put into a problem without turning students off immediately. It transforms a dry word problem into a puzzle that the students must piece together in order to find a solving strategy.

I couldn’t find an easy way to search for resources for this specific activity on the IM website (that might be user error), so I ended up building out my own routine and my own problem sets for a bunch of spots in my Algebra 1 curriculum. I have started making some problem sets for Geometry too (arc length and triangle proofs are included below) but I will hopefully be adding pythag, angles, and triangle trig problem sets soon.

This routine forces collaboration, and I reinforce that with middle schoolers by asking them that they show their work on this note-catcher with different colored ink.

I used this routine with great success at my school in Seattle, and the two times that I have tried it since moving to Colombia have worked pretty well too. (my classes are bigger, so I did away with the note catcher. They solve on whiteboards now). I like to print the “question” sheet on colored paper, and pre-staple and pre-cut so that I can quickly hand out each new problem to groups as they finish the problem prior. It’s worth the prep.

I also try to give groups problems in a random order so that they are working together against each problem, and not trying to race other groups in the class. When this routine works, your main job is to monitor, give feedback and check their thinking against an answer key. Here’s some stuff I made. I hope it’s helpful!

Resources:

Editable powerpoint slides:

PDF versions of:

Open Middle VERSUS

Many of you have probably used Robert Kaplinsky and Nanette Johnson’s wonderful Open Middle math problems. There are great problems and resources for running these problems with students on the open middle website and in Robert’s book.

The best ones are on their site, but I have made a few that I shared on my twitter.

The idea I had last week was to think about “playing” this problem against someone else. OPEN MIDDLE VERSUS.

I haven’t tried anything like this with students yet, but I think it could be a fun extra layer. Not only do students need to figure out which digits they need to create a large value for x (9, 8 and 1) but they need to figure out how the numbers play together, and which one is the most important to creating a big value for x. I think the 1 is most important, so maybe this version of this problem would drive a better discussion:

I think it could lead to some fun discussions in class, and you could use this for any type of open middle problem that uses 3 or 4 numbers:

Again, 1 is going to be very important. Is there a reason why?

Walter Joris Puzzles

I cannot take credit for any of this. I just loved playing around with these games with my students and I formatted them into a ppt file.

I stumbled across this incredible Ben Orlin blog post while I was poking through Desmos activities to run the first day of this new semester. Go read it. It’s funny, and gives descriptions of six delightful 1 vs 1 games from game designer Walter Joris.

I ended up formatting the instructions to these games into a powerpoint with Ben’s drawings so that I could project them onto the board for my students. The first day back, I brought a ream of blank paper and a bag of bon-bon-booms as prizes. (If you’ve been to a tienda in south america, you get it. The red ones are best.)

I drew a bracket on the board with student names, and after each game, the winner moved on. The detailed instructions are in the blog post linked above, but the ppt file is linked below. Black hole was our favorite game, but “collector” wasn’t far behind.

Qwixx (Special Boards)

Ten years ago, I found the game Qwixx at a game shop in Seattle. The bright colors on the box sucked me in. It is the perfect mix of strategy and luck, and it has a ton of replay value. It’s a seriously great game.

They have been making a bunch of expansions for it (especially in Europe), and me and my buddy Chris Bakke found a version where the colors are all scrambled around. It’s called “qwixx mixx.” and it looks like this:

How to play Qwixx Deluxe | Official Rules | UltraBoardGames

The color of each space corresponds to a dice color, and in this version, instead of closing out a “row” you close out a “color.” (Full rules for these boards are available here) It’s a fun wrinkle, and we started talking about what OTHER ways you could reconfigure the colors of the board. Like, why can’t you play with a board that looks like this?:

Or this one:

I ended up using ppt and making a bunch of the patterns that we talked about. I printed them on cardstock, and laminated the fronts, so we could use them with dry erase markers. If you print them from the pdf (or “2 slides per page from the ppt) they are the perfect size to fit in the box that comes with the game. Now when we play, we start by drawing a board at random from the deck of 12 or so boards that we created. Your board doesn’t match your opponents, but the probabilities are similar (or the same) and it makes every game a little different. I love the added variety, and because all this fits in the little box, it’s a game that Emily and I bring with us whenever we go anywhere.

Also, the best image of a qwixx board that I was able to find at the time is in dutch, so as an added punishment for taking a strike you have to try to pronounce “Elke mislukte worp.”

Pick ’em

A quick write-up on an even quicker routine that I use regularly in my class: Pick ’em.

Who doesn’t like a good booger joke?

Way back when I was teaching in Denver, I came up with this idea for a role board. Each desk in each group (I group my kids in groups of 4) gets a small dot of nail polish. Red, Blue, Green or Yellow. It lets me assign tasks randomly to students in a group. For example, “Red desk, bring up papers for your group” or “Blue desks, share your ideas at your table first.”

To go with the dots of color, I bought these clear containers at The Container Store and made some little colored circles out of construction paper and a Dominoes pizza box.

The circles are red, blue, green and yellow and match the dots on the desks, and I move the dots each time before I use them to assign jobs. With the “1,2,3,4” role cards shown above, the blue desk would go first, then the green desk, then red, then yellow.

I like this setup because it is very visually clear what each kid should be doing, and it keeps things random for the kids. It’s also very easy to create new “role” cards for behind the dots, so you can use the roles for a wide variety of classroom activities. I use this role board with many of my classroom routines, but this is the simplest one. I use it as a better “you do” activity when I use direct instruction in class.

I start by putting up a set of problems (this is a graphing problem set) for the kids to see. The desk whose color is in the “1” position gets first “pick” of the problems on the board. They would share with their group what they pick, and begin working. “2” picks next and so on. No two members of a group can pick the same problem. It introduces a small amount of choice to class, every kid at each table gets a different problem, and gets the kids talking about the problems that they are working on.

I also use a variant often that I call “Pick and Role”

It’s basically the same thing, but I have the students TEACH the rest of their groups how to solve the problem that they are working on. I usually provide a vocab bank for them to use, and again, I use the role board to assign who explains their process/ thinking first.

Sometimes, I have the kids pass their mini-whiteboards to the next person in their group to have them grade each other’s work. I call that Pick ’em, Pass ’em. And I use this graphic. Because Boogers are funny. Even if you’re 34 years old.

Cake Recipe (proportions)

Wanted to share a quick proportional puzzle/resource. I created this while I was working in Seattle, and I thought it was fun. Students get a set of six recipe cards with ingredients to make chocolate cake. One such card is shown below.

As you can see, this recipe is for 48 people, and it is MISSING several key ingredients. The other recipe cards include the same recipe for a different number of servings and different missing ingredients.

Students must use the clues on the different recipe cards as well as their proportional reasoning skills (cross multiplication, scale factor, unit rates) to fill in the missing pieces and create a complete recipe. I had them create a recipe for 12 people from the information on the cards.

I printed and laminated these cards on sheets of differently colored paper so they stand apart. Before the pandemic, we actually made the recipe, and cooked the batter in orange rinds (in tin foil) on a barbeque grill. It worked pretty well, and it was a fun application of proportional reasoning.

Resources here!